LESSON DETAILS
TIME TO COMPLETE: 10 minutes
WHAT YOU NEED: A guitar
SKILL LEVEL: Beginner
INTRODUCTION
If you have read through the first lesson here, you will know how effective these types of exercises are in assisting you play awkward chords or any wide stretching guitar part. The exercises in this lesson will focus on stretching your hand out to help you play chords.
The exercises will get you used to changing all four fingers at once into new chord shapes. As well as stretching your fingers out, the exercises will also help you speed up the time it takes you to move between chord shapes. Take your time practicing the exercises and remember that it’s always better to play something slow and perfect rather than fast and sloppy.
EXERCISE 1
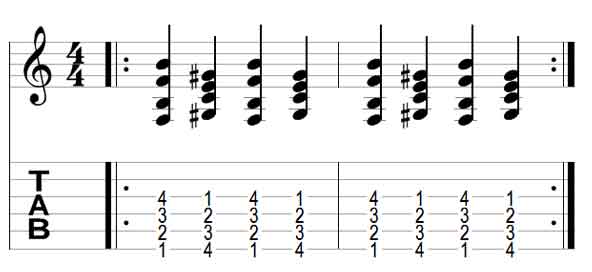
This exercise uses extremely simply shapes that are very easy to understand. Check out the TAB below and have a think about which fingers you will need to use for the two shapes.

It should be pretty obvious that you need to use one finger per fret and that the finger number will match up to the fret number. In other words, you use your 1st finger on the 1st fret, 2nd finger on the 2nd fret, 3rd finger on the 3rd fret and the 4th finger on the 4th fret. This is why it’s an easy shape to learn.
When you play the chord shapes, don’t worry if they sound bad, they aren’t meant to have any decent musical quality – it’s purely and exercise.
The idea with this exercise is to play the first chord with all fingers as close to the frets as possible, then quickly change all four fingers into the second chord shape. Every time you play a chord, make sure your fingers are in perfect position right next to the fret and all four notes ring out clearly. If you hear any buzzing or muted notes, stop immediately and correct any problems. There’s no point practicing mistakes over and over.
TIP: A great way to improve your speed when changing between the chords is to play along with a metronome. If you haven’t done this before, check out this lesson to learn the basics. Play each chord in time with the metronome click and slowly increase the tempo every day you practice. In no time you will find yourself playing rapid changes with each chord sounding clean and precise.
EXERCISE 2
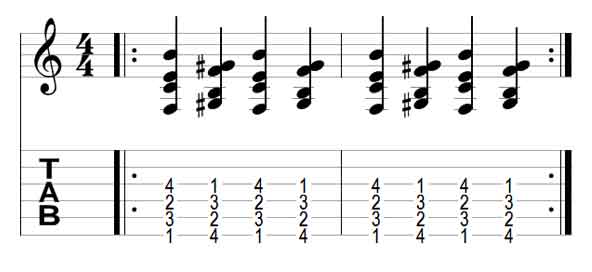
The chord shapes in this exercise are almost exactly the same as in the first exercise. If you look at the number patterns in the TAB below, you can see the only change is the two middle fingers have been swapped. Instead of having a straight line across your fingers, there is more of a zig-zag. This makes it harder to play as it won’t be as straight forward when placing your fingers in position.

Only attempt this exercise after you feel confident when playing exercise 1. The exercise is played the exact same way as exercise 1, in that you play the first chord shape, then quickly change to the next shape and play that chord. You will basically be jumping back and forth between the two positions while making sure every chord is played clean and precise. Again, it is a good idea to practice the chords in time with a metronome.
EXERCISE MODIFICATIONS
If you find the exercises above too hard to play, there are a few options you can try that should make them a bit easier. It may be quite a big stretch for beginners to play the chord shapes on the lower four frets as it is quite a wide jump. If you feel pain in your fingers when playing the shapes, or simply can’t reach that far, try the modifications described below.
- Try playing the chord shapes higher up the neck. Instead of starting on the 1st fret, try the 5th fret, or the 7th fret. As you move up the neck the frets become closer together which makes it easier to play
- Try playing the chord shapes on different strings. If you have trouble reaching all the way to the low sixth string, try moving the shape across to the first four strings. The chord will sound horrible, but it may make it easier to play.
If you try these modifications, try to work your way back until you reach the positions described above. For example, if you have trouble stretching across the lower four frets, start on the seventh fret. Then every day see if you can play the chord shapes one fret lower. So on day 2, try the shapes on the 6th fret, on day 3, try the 5th fret and so on until you can comfortably play the shapes on the lower four frets.
SUMMARY
Don’t be fooled by the simplicity of the explanations above – the exercises are extremely useful. Take your time to work at these exercises until you can play them at a high tempo while still playing them perfectly every time. The worst thing you can do is to rush through them at a high tempo because they will end up sounding sloppy. A guitarist that takes their time to learn these exercises will always sound better than one who rushes through without any real effort.
Check out more lessons here.
