Lesson Details
TIME TO COMPLETE: 15 minutes
WHAT YOU NEED: 50 Essential Chords Pack
SKILL LEVEL: Beginner to Intermediate
Introduction
So you’re learning guitar and you bought yourself a pack of 50 flash cards. You’ve spend a lot of effort memorizing all fifty using exercises and mnemonic devices, then spent even more time learning to strum the chords and change between chords without stopping. Moving on you learned a bit of music theory and found out how to come up with interest chord progressions to write your own basic songs. Now what?
Once you get to this stage it can seem a bit confusing as to what happens next. There’s plenty of lessons on how to learn the chords, but how do you apply them? This lesson will give you a very brief overview of the different ways you can play chords. Once you learn a few different ways other than the standard strumming method most guitarists choose by default, you will be able to open up your playing and write beautiful music.
The great thing is that once you get to this stage, it’s a piece of cake from here. You’ve already done the hard work in learning the chords, now you have the freedom to play them however you like. Keep in mind that the ideas suggested in this lesson are just that – ideas. You can experiment and come up with different ways to play the chords depending on what sound you’re going for. Play through these ideas and think about whether you like how each sound or not. Eventually you will build your own style around how you play chords. This lesson is just a starting point.
Playing chord progressions
All the examples below will use the same two chords – Em & G. This is so you can easily compare and contrast the different methods without being distracted with different chords. Have a play through all examples using these two chords, then play them again with new chords. This is how you will start off writing music – by experimenting.
1 – Standard Strumming
This is the ‘default’ method to playing chords. Beginners are taught to strum chords in simple patterns and many guitarists never deviate from the standard ‘pick a chord and strum’ method. While this method is great for simple songs, if this is the only method you use, you’re playing can sound stale. If you are just starting to learn guitar, this is the first method you should try as it is incredibly simple.
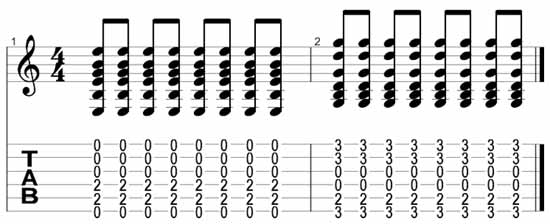
The below example shows the most basic way to strum chords. Notice that all notes are identical in rhythm. Playing this way can become boring quickly so if you want to play a simple song and strum chords, it’s a good idea to change the rhythm and strumming patterns so something more interesting.
2 – Using rests to change the rhythm
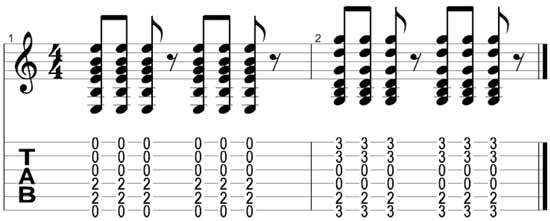
One of the most effective ways to improve the dynamics in a song is to add in rests to your strumming. The below example is identical to the first example with one small change – rests are added in replacing every fourth chord. Compare this chord progression to the first one and you can easily hear how effective this simple change is. Try experimenting with adding rests in different places and change how long each rest lasts for.
3 – Using palm muting to change dynamics
Adding rests can be quite a dramatic change to the dynamics of a progression. If you are after a subtle change instead, palm muting may be the way to go. By controlling how much pressure you apply to the strings, you have full control over how much each chord rings out. Soft acoustic ballads can sound more expressive and soulful when palm muting is used effectively.
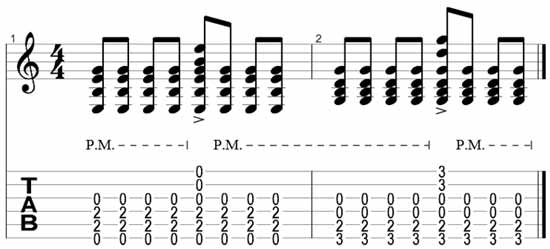
Try playing the below example and compare how it sounds to the first example. Play the example again a few times while adjusting how much palm muting you apply. In other words, change how the chords ring out by adjusting your position on the strings. This example releases the palm muting from the strings on the third beat of every bar. This allows that chord to ring out at full volume to provide a nice rhythmic feel. Notice that only the lower four strings are played during the palm muting? This is because the lower strings sound better with palm muting and playing all six strings doesn’t give the same effect. Try playing the example strumming all six strings to hear how this improves the sound.
4 – Playing on the up-beats
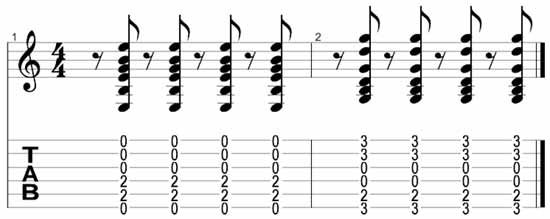
If you play this example on its own, you probably won’t notice anything interesting. But try playing this along with backing track or drummer and the effect will be obvious. This way of strumming chords is very common in styles such as reggae and funk. We are used to hearing the chords on each down beat so shifting the chords slightly to the up beat has an interesting effect on the rhythm. Try playing this progression along with a metronome to improve your timing.
5 – Playing arpeggios
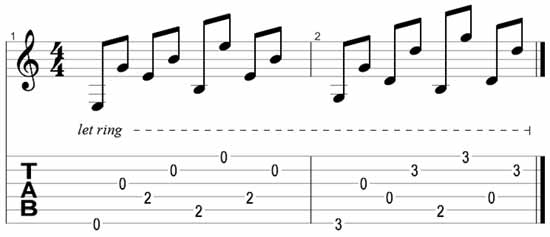
If you come up with a chord progression, you don’t always have to strum the chords. Splitting the chords up into ‘arpeggios’ is an incredibly effective way to change the feel of a progression. Instead of strumming the full chord every time, you will only play one note. Have a look at the below example and see how each chord is ‘split’ into individual notes. The chords are still there – the only change is how you play them.
This method is very effective when playing on an acoustic guitar because you can use fingerpicking to create a very mellow sound. Once you feel comfortable with this picking pattern, try to come up with your own patterns and listen to how it affects the feel of the progression.
6 – Splitting the chords up
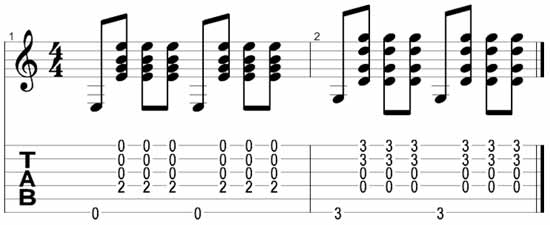
As explained in the above example, you don’t have to play the full chord all the time. You can split the chord up into parts. This example shows you how you can split up the low and high part of each chord and how it affects the feel of the progression. Depending on how you play this example, it could come across with a folk or country feel. You don’t have to always split the chord up this way, so after you feel comfortable playing this example, try to split up chords in different ways and listen to the result.
7 – “Boom, chuck”
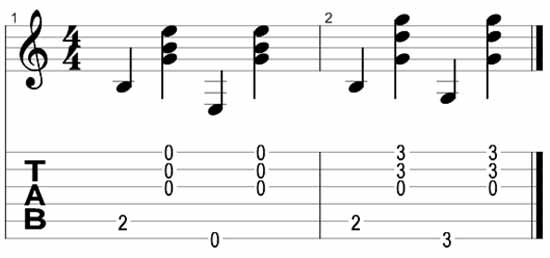
This is an extreme example of splitting up the chords as described above. The ‘boom, chuck’ name comes from how it would be played in a country song. The lower notes are the ‘boom’ and the higher parts are the ‘chuck’ sound. Play this example with fingerpicking and try to really pluck the higher strings to get the ‘chuck’ sound. Repeat each bar twice to really get the country feel.
Summary
While this list is by no means exhaustive, it should give you enough different ideas you can use to change your chord progressions from the standard strumming shown in example one. After you spend some time with these examples, try to come up with fresh ways to play chord progressions. The whole idea is to get you out of the default method and thinking creatively. So many guitarists never move on from the type of playing used in example one, so even if you learn one extra method, you’re already ahead of the game.
