Tempo Music Cards' Facebook Page

Stay up to date with new lessons

If you like the lessons available on Tempo Music Cards, you can stay up to date with new lessons and articles easily using Facebook.

Simply visit our Facebook Page here and click like. You will then receive notifications of new lessons and articles in your Facebook feed.

Tempo Music Cards' Facebook Page

Tempo Music Cards on Facebook

If you like any lesson or article and want to read it again later on, a handy way to keep track of it is by clicking the ‘like’ button at the very bottom of every lesson page. Then you can always find the link to the lesson in Facebook when you want to read the lesson again.


Other ways to keep track with new lessons and articles

If you don’t use Facebook, there are plenty of other ways to keep up to date.

We’re on Twitter so feel free to follow us: @tempomusiccards

On Twitter we keep our followers up to date with new lessons, but we also tweet useful links.

Aaron Matthies (who writes the lessons) is also active on Yahoo Answers and helps out beginners with their questions so if you get stuck with anything, you can either post a question to Yahoo Answers or feel free to ask on our Facebook Page.

If you prefer you can stay up to date using our RSS feed. If you don’t know what that means don’t worry.

Finally you can subscribe to our monthly newsletter which will send you one email per month covering all the lessons and articles. Subscribe by entering your email address in the top right of the page under the ‘Tempo Music Cards Newsletter’ heading.

Guitar FAQ: How to correct bad habits (Part 1)

In this three part series we will look at how to identify and correct any bad habits that you may have right now. This first part will explain how you can recognize bad habits in your own playing. Correcting bad habits is so important for every guitarist which is why this crucial topic has been spread across three separate posts.

Why you need to correct any bad habits

It doesn’t matter if you want to become an expert player or if you just want to play for fun, you need to stop any bad habits from forming. Even habits that may seem minor can significantly impact your ability to play over time. The main problem with bad habits is that they’re very easy to form and very hard to fix. Nobody is perfect and it’s okay to acknowledge that you probably have some bad habits right now that you may not may not even realize.

The main benefit you will get out of correcting any bad habits is the freedom to play guitar the way you want. Bad habits restrict you and halt your progress. It’s not very fun to have pain in your hand or arm because a bad habit is forcing you to play awkwardly. Take your time to fix these problems and you will enjoy guitar a lot more as well as be able to do a lot more.

How to identify bad habits

Let’s look at a very effective method you can use to identify any bad habits you may have already formed. The method is pretty straight forward – record a video of yourself playing. This doesn’t have to be a great quality video. Any digital camera or even a webcam will do the job.

Set up your camera in front of you and make sure your entire body is in the frame. Make sure you wear a T-shirt or any short sleeve shirt so you can see your arms clearly. Hit record and play for about one minute going through a wide range of material. Do some improvising, play some riffs you know well, try some solos, scale runs and anything else you normally play.

Once you finish playing load your video up on your computer or TV. This is important because you need to watch the video on a big screen to properly see what is happening. Watching the video on the small camera screen or phone isn’t going to help.

Watch the video and for the first viewing just listen to what you’re playing. Think about the below questions while watching the video:

  • Does everything sound the way you expect it to sound?
  • Do you notice any problems with your playing that you didn’t notice while playing?
  • Do all the notes ring out clearly?
  • Was there any string noise or any other noise you didn’t notice while playing?


Ask yourself the above questions about the sound of your playing and the overall feel. This is possibly the most important point because the whole purpose of correcting any bad habits is to improve your playing. If you can pick up any obvious problems in your playing now it’s going to give you the biggest room for improvement.

For the second viewing, really focus on your picking hand. Don’t look at anything else and just keep your eyes focus on what your hand is doing and it’s position. This time think about the below questions while watching your picking hand:

  • Does it look awkward?
  • Does your hand look tense?
  • Does your arm look tense?
  • Do you see any arm muscles tense up while you play?
  • Does your hand lock in position or is it loose?
  • Does your hand float above the strings or do you anchor your hand using one of your fingers?
If you sometimes feel pain in your picking hand, the above questions will help you identify the problem.

For the next viewing, focus completely on your fretting hand. Think about these questions:

  • Do you use your fingertips to fret the notes?
  • How does your pinky move?
  • Does your pinky hide behind the neck or does it stick out in the air?
  • How many fingers do you use? Do you tend to only use two fingers or do you use all four?
  • Does your thumb stick up over the neck?
  • Is your thumb held to the side or does it point up to the air?
  • Is there a gap between your hand and the neck?
  • Does your hand look tense?
  • Does your hand flow up and down the neck or is your movement erratic and jumpy?
Next, keep focus on your arm for your fretting hand. This often reveals many issues that aren’t obvious when just looking at the hand. Think about the following questions:
  • Does any part of your arm seem tense?
  • Does your elbow seem stiff or does it move freely when you move up and down the neck?
  • Are you holding your arm close to your body or is it free to move around?
  • Does the position of the guitar force your arm into an awkward angle?
Finally, have a look at your overall body posture. This is important as it’s often the last thing people think about when playing. Think about these questions while you watch the video again:
  • Are you slouched forward?
  • Does your head hang low as you try to look over the fretboard?
  • Are you sitting up straight with your shoulders back?
  • Is your body twisted with your legs crossed or over to one side?
  • Are your feet flat on the ground?
  • Does any part of your body seem tense?

What to look out for

If you take the time to follow the steps above and critically look at your posture and playing technique, you will no doubt pick up on habits you didn’t even realize you had. If you didn’t find anything wrong with your posture or technique, maybe you need to think about which is more likely: you’re a perfect player or you didn’t look hard enough. Even expert players will be able to find minor problems they can correct. Don’t kid yourself and claim you have perfect technique because the only person who loses is you in that case.

This is an opportunity to prevent any issues before they turn serious. If you recognize that your arms are always tense when you play, unless you correct it now you could end up with serious issues years down the track. Even small issues such as your pinky hiding behind the neck can limit your abilities later on.

Next steps

Follow the steps above and really have a close look at your playing. Play the video over and over and even look at it in slow motion. If you’re honest with yourself and pick up on problems you will be a lot better off. After you follow this advice, save the video and re-record another video in one or two week’s time. Repeat the same steps and see if you’ve made any improvements. The more times you repeat this process the better off you will be. After a few times you will pick up on more issues as you will be able to be more critical on your technique. This is a good thing as it will help you as you go.

The next part in this series will look at various ways you can overcome any issues once you identify them. Give this a serious go and you will be happy you did.

String skipping exercise

Guitar exercises: String Skipping

What is string skipping?

String skipping is when you jump from one string to another string that isn’t immediately next to the one before it. Huh? In other words, if you play a note on the low E string then play a note on the B string, you are ‘skipping’ a few strings. On the other hand, if you play a note on the low E string then play a note on the A string, you haven’t skipped any strings.

Why it’s important to practice

Most beginners run into issues when they need to use string skipping. If you have ever picked a string then realized you picked the wrong string, you know how frustrating it can be. This can be a big problem if it isn’t fixed early. So we have put together a couple simple exercises you can use to help improve your ability to skip strings at will.

Exercise 1

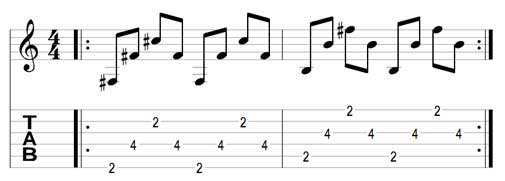
This exercise is very basic but gets the job done. As you can see the pattern is pretty straight foward. The pattern repeats twice then in the next bar it repeats, but starts on the next string across.

String skipping exercise

You can see that each note you play will be jumping across the strings. Start off playing this exercise very slow to make sure you play each note correctly. It’s up to you how you pick the notes (eg: alternate, all down, economy) because the main focus is picking the right strings.

After you can play the exercise well from memory, try playing along with a metronome and increase the tempo over time. The faster you can play this, the more accurate your picking will become. But remember not to rush yourself as the main point is to play accurately.

Exercise 2

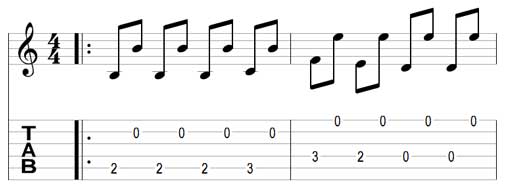
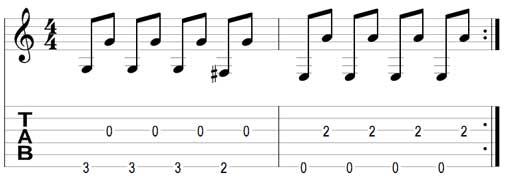
This exercise is slightly longer but is based on the same basic idea. This time instead of playing notes on three strings, you are alternating between two strings on far sides of the guitar. This will help you get used to jumping back and forth between two strings. As you can see throughout the exercise, the two strings change so you get used to different sized jumps.

String skipping exercise part a

String skipping exercise part b

You may find this exercise easier than exercise 1 simply because you only need to jump back and forth between two positions where as the other exercise you need to jump across three positions. So if you have trouble with exercise 1, this exercise is a good one to start with. But make sure you practice both exercises as they both help you learn the skill in different ways.

Just like exercise 1, after you feel confident with this exercise, try playing along with a metronome and see how fast (and accurately) you can play it.

A lot of beginners have trouble with string skipping, so if you know anybody who would benefit from these exercises, please click the social media buttons below to share it with them.

Top 6 tips to help you memorize guitar chords

There are so many memory tricks and games you can use to help you memorize all those guitar chords. We will look at ten extremely effective ways to memorize those chords. As this is a site dedicated to using guitar flash cards to learn chords, some of the tips will require you to have the 50 Essential Chords Pack. If you don’t have the pack yet, there are other tips you can still use right now.


1. Using mnemonic devices

Mnemonic devices are little tricks you can use to help you remember chord names and shapes. This is similar to how people remember how many days are in a certain month, you probably learned a song at school. Mnemonic devices are effective because they are easy to memorize on their own. If you did learn the song to memorize the days in each month you probably still remember it now. In the same way it’s really easy to memorize guitar chords using similar tricks.

In this lesson on mnemonic devices you will learn an extremely easy way to memorize the shapes and names of guitar chords. The lesson gives you examples and diagrams to help you understand how to properly use the technique. By spending a few minutes each day thinking about this tip you can drastically improve your recall rate on all chords.


2. The 10 minute method

We have put together a comprehensive method to help you memorize all chord names, positions and to even help you change between the chords faster. As the name suggests, the method will only take 10 minutes every day. The reason for the very short practice session time is because it focuses your attention and helps you remember what you did. If on the other hand you tried to spend one to two hours following the same method, you would burn out and wouldn’t remember anything.

Read about the 10 minute method here. The 10 minute method is also incorporated in our 30 Day Guide which comes with our flash card packs.


3. Learn to work out chords in a key

When you understand keys and how to figure out the chords within a key, it actually makes it easier to memorize each chord because you will know which keys they fit into. For example, if you know which chords work with the key of C Major, then you will understand how each of those chords are related and you will be able to group those chords together. So as soon as somebody says, ‘what chords are in C Major?’ you will find it a lot easier to remember each individual chord.


This lesson will help you understand how chords fit into keys and if you don’t understand the Major Scale, it’s recommended you read this lesson first.


4. Carry one flash card around with you each day

This is a very easy way to memorize chords if you have our Guitar Flash Cards Pack. You simply pick one of the cards and carry it around with you everywhere you go. Keep it in your pocket and whenever you have a spare second simply pull the card out and look at it. Look at the shape of the chord, the chord name, the chord formula, the finger positions, the notes in the chords and imagine holding your hand in the correct position. This is a really easy way to improve your memory without having a guitar with you. The next day you simply pick a new card and take that with you all day. Over time by following this easy tip you will find that whenever you think of those chords your memory will be able to picture the chord shape, notes, name, etc.


5. Just practice strumming between chords

If you ask most guitarists how to memorize all the chords they will most likely respond with, ‘practice!’. There is a good reason for this. Practicing is the best method because when you actually use the chords in a practical way, your brain works harder to memorize them. Every time you place your fingers in the correct positions you brain will be trying to memorize that position. So this tip is simple: pick a few chords and practicing strumming each one four times then move on to the next chord. Repeat this over and over then pick another set of chords. The more often you follow this method the faster you will memorize them. Plus there is the other benefit of improving your strumming and chord changes.


Although the other tips listed here will definitely help you memorize the chords, unless you practice using them you will still have trouble playing. So use a combination of all of the above tips and you will find that you memorize all the chords in a very short time.


6. Use a metronome

This tip follows on from tip 5. Instead of just strumming the chords then changing to the next chord, try using a metronome to force you to play along with a certain tempo. Start the tempo very slow to begin with then gradually increase it until you find it hard to keep up. The reason this is so effective is because it forces you to push yourself to play faster. Every time you challenge yourself to play faster and better, you will improve.


This lesson will help you use the metronome if you have never used one before.


Summary

The reason all these tips work is because they each work you in different ways. Some of them get you to think about the chord shapes, some get you to think about the theory behind the chords and others get you to memorize them by simply playing them over and over. The best way to memorize all the chords in the shortest time is to use all the tips above. Using learning tools such as our Guitar Flash Cards and a metronome will enhance your learning. For more tips and hints check out our Tips and Games page.

How many open chords do you know right now?

From time to time it’s always worth checking your current level of knowledge related to guitar. Knowing how much (or how little) you know about a certain area helps you identify any strengths or weaknesses you can work on. So take five minutes now to work out how many chords you really know. Not how many you think you know, but how many you have memorized.

To do this properly you need to take a piece of paper (or open a program to type notes) and pick up your guitar.

  1. Without looking at any reference material start on A and play all the chords based on A you can think of.
  2. Once you play a chord, write down the chord name. If you don’t know the proper chord name, then you can’t write it down. Alternatively, if you know the chord name but can’t remember the finger positions, you can’t write it down because you haven’t properly memorized it.
  3. Once you have played all the chords you can think of based on A, move on to B.
  4. Continue this pattern all the way from A to G (don’t worry about any chords such as D# or F# as we are just focusing on standard open chords)

Once you have your list of chords, count the total for each note grouping. Add up the total open chords.

To give you an idea of the number of basic chords to compare your memory to, below is the total number of chords in the 50 Essential Chords Pack by note name.

Chords based on A: 8

Chords based on B: 4

Chords based on C: 7

Chords based on D: 9

Chords based on E: 9

Chords based on F: 5

Chords based on G: 8

Keep in mind that there are of course more possible chords than what is listed above. This will just give you an idea what areas you know well and which areas you need to work on.

For example: say you can think up of only 5 chords based on E and you know 6 chords based on B. Now you know you need to learn a few more chords on E and you also know you have a good understanding of chords based on B.

After you compare your results to the list above, make a note to learn a few more chords in the areas you fall short in.

Take five minutes to complete the steps above and you will gain insight to your current understanding of open chords. Repeat this simple test in a month and compare your results again.

Beginner guitarist buyer’s guide

If you want to learn guitar or have just decided to do so, this buyer’s guide will give you the basic information you need on the essential gear to get started. Missing out on some of these items can create a big hindrance to your development. Read through this post to get an overview on the basic gear you need to get started.


1. A guitar suitable for a beginner.

This may sound obvious but the truth is not all guitars are suitable for beginners. There are many guitars out there that are extremely hard for beginners to play. If you happen to buy one of these guitars without knowing it, you’re in for an extremely tough ride.

There are two basic guitars best suited for beginners. They are:

Basic nylon string acoustic, or
Basic ‘strat’ style electric.

For an indepth article on whether you should learn on an acoustic or electric guitar click here.

If you’re still unsure, the easy choice (and cheaper) is to use a nylon string acoustic guitar.


2. A guitar tuner

There are many different forms of tuners you can buy from electronic tuners to pitch pipes (don’t bother with the latter). You can even download tuner apps on your phone so there’s no excuse for not getting one. A decent electronic tuner will cost around $20 so stop by your local guitar shop (or ebay) and get yourself one.

The reason why a tuner is so important: nothing is more discouraging than hearing yourself play an out-of-tune guitar.

When you strum the strings thinking your fingers are in the right position for the chord and it sounds horrible, you’re going to feel like you’re doing it wrong. Even if your fingers are in the right position, you will still feel like you’re playing it wrong. It’s a horrible thought to think that many beginners have given up the guitar simply because they didn’t have a tuner to keep their guitar in proper tune.

As a side note: while it’s definitely worth learning to tune your guitar using only your ears, that’s not a reason not to buy a tuner. If you mention to a guitarist that you’re going to buy a tuner and they reply, ‘nah don’t bother, just use your ears’ – don’t listen to them. Remember that you’re a beginner and your ears need to develop. To develop your ears you need a guitar in tune.


3. A basic guitar instruction book

Even if you decide to learn from a guitar teacher, which is definitely a good decision if you can, buy a guitar instruction book. Even know sites like this one contain plenty of lessons and articles that would be included in the book you buy, it’s nice to have everything all in one place. Having diagrams and easy to read sheet music in a clearly printed book goes a long way. Most books include DVDs that demonstrate the techniques which is invaluable if you decide to teach yourself.

A basic guitar book doesn’t cost much so even if your guitar teacher gives you plenty of other resources it’s nice to have a book that explains things in a different way.


4. Guitar flash cards

This site wouldn’t exist if flash cards weren’t effective learning tools. We have worked very close with many guitar tutors and students when developing our guitar flash cards. They are extremely effective and we have plenty of resources available to help you use them. The best thing about guitar flash cards is that you can use them how you want – you can play memory games and choose how you want to learn the chords. You will find many chord dictionaries and charts in shops that look like a good buy, but in reality they aren’t effective. Learning from a dictionary is as boring as it sounds.

To get an idea why our guitar flash cards are so worthwhile, read this page.


5. Picks, strap, spare strings, etc.

Unfortunately, it won’t take you long until you lose a guitar pick, or break a string. If you only have one pick or don’t have spare strings, then you will find out how frustrating it can be. The easiest way to avoid this situation is to buy a heap of picks, spare sets of strings and all the other cheap accessories available. There’s nothing more frustrating then coming home looking forward to playing some guitar and you can’t find your guitar pick. Or when you strum that first chord and a string breaks.

Bottom line: if it can break or you can lose it, buy spares.


Summary

Although there are other items worth getting, these are crucial to start out with. Something like a capo can wait until later on after you learn a few chords. Start out with these basic items and you will have everything you need to take the first few steps to learning guitar.